Pages

Saturday, December 31, 2011

SOTM Blog Hop

Happy New Year!!!  My family is not a big fan of this holiday - my husband always had to work ( he is a retired Captain on the Fire Department) so the night is usually very quiet for us.  But we are cooking for our son and DIL and we are delighted to have them close by for this holiday!  So I will be posting my pictures in the a.m of my awesome 2012 journal and I hope you enjoy it! 

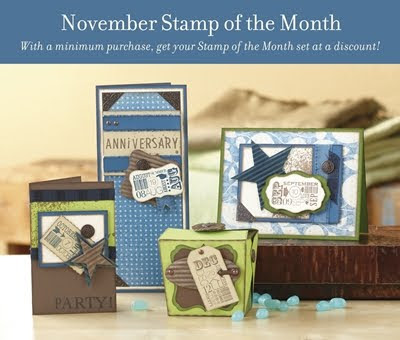
So if you are hopping you have come from Judy's blog and found some serious inspiration for this month's Stamp of the Month S1201 Little ReminderI know this is one of those universal stamp sets that you can use over and over again so I would grab it immediately here!


Here is my Journal for 2012.  My top resolution for the year is to use my "stash" both for my sewing as well as my scrapbook stash.  So I started digging and found the retired "You and Me" paper pack and stamp set.

Supplies: 
You and Me retired paper pack and stamp set
Colors are Creme Brulee, Olive and Chocolate

Here are a few steps so you can also recreate a journal for the new year.

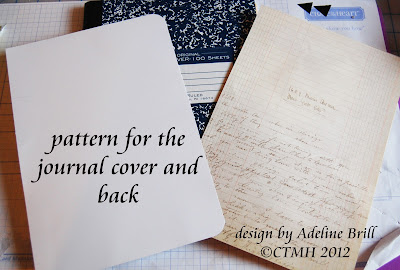
Step #1- Create a pattern for the composition book.  Then cut out a cover and back for your journal.  You may also cover the inside front and back as well.

Step #2 - Cut out your strips to make the journal tabs.  I cut 6 - 1" x 7" and the cut them in half. 


Step #3 - Cut out your strips to make the journal tabs.  I folded them in half and then glued them to the edge of the individual sheets staggering them to create the tab extensions.


Now it is off to Michelle's blog to check out her inspiration for the month!   Keep hopping through the entire blog because you will be amazed at the creativity of all of the consultants.

I wish everyone a VERY Happy and creative New Year!!


So sorry....

The last few weeks have been very difficult for me.  A good friend had surgery and now needs chemotherapy and radiation.  This couple owns the business where I work and I am more than willing to help out.  BUT that means time away from home.  I hope you will understand and forgive me for the lack of communication in finishing my 12 Days of Cricuit Christmas!

I did commit to giving a gift to one lucky person who left a comment and I will be sure to accomplish that after the 1st of the year.  So please do look for that.  BUT I hope everyone of my creative friends will have a happy and HEALTHY New Year...

Thursday, December 8, 2011

12 days of Christmas Boxes

I finally had some time to participate in the Pazzles Craft Room December challenge at www.pazzles.com

I bought myself a Pazzles as a retirement gift because I knew I would have more time to learn how to cut my own files!  Each Tuesday and Sunday I take a FREE class on the software with Klo and I have learned soooo  much!

I purchased it with a one year subscription to the Craft Room and that was the best decision I made!  Lots of support and a plethora of creativity.

Supplies:
Paper is from the winter pack from DCWV
Snowflakes from the Pazzles Craft Room - free when you belong :)
Ribbon and sparkles - from my 'stash'


(Directions for The 3 D Snowflake ornament is in the previous post!)

Enjoy!

Day 8 MORE Snow!

This morning was another cold morning in Tampa - brrrr......43 degrees!  I know, I know BUT that temperature is cold for us!  So today I bring you more SNOW - snowflakes, that is!

3D Cricuit Snowflakes

These snowflakes are actually rather easy to make! 

Step #1 - Cut 6 snowflakes - I used Snowflake 3 (last design on the top row- top right) shift at 3.5" for the snowflake on the right and Snowflake 2 at 4" (7th design top row) both shift and layer.

Step #2 - For Snowflake 2 - glue the layers onto the snowflake base.

Step #3 - Then score all of the snowflakes in half and glue two halves together.  I glue a ribbon hanger in the middle before I added the last unit.
Step #4 - Optional - I added Stardust glitz to the edge of the white snowflake. 

Enjoy!

 ( the prize includes the D1480 Snowflakes stamp set, the tube of Heavenly Blue ribbon and the decorated jar of white Christmas ribbon!)

How about some snowflakes of your own??  I will be giving away this prize on the last day of my Christmas event!  BUT you must leave a comment and so far the odds are pretty good! 1 in 7... :( 

I would love to read any comments you may have ( and I am wondering if I should do this again...)

Forecast for Tampa, FL tomorrow... Sunny and high of 73 degrees...  hmmm - will there be any more snow???


Lisa Stenz is having a AP blog linky party Such fun! - check out all of the holiday designs below...

Wednesday, December 7, 2011

Day 7 It's snowing again!

 Are any of you getting nervous yet?  I am!!  I have purchased only 2 gifts!  YIKES!!!  The problem is 'what to buy?' for my family.  Anyone else have the same problem?

Today's post is a 'quick' gift for a crafting friend.  I L-O-V-E ribbon and I can never have too much.  These quick little gift was a table prize for the Kids Krop in October.  So quick and easy to complete.  Each jar had a theme color - Halloween, Christmas, Valentine's Day - you get the idea!   Do you have anyone who would love this small gift?
Supplies:
Small canning jars
Assorted ribbon - all white
White daisy and Heavenly blue cardstock
Cricut design - Circle 1 - 2.5", Tag 1 2.5" , Decorative Layer of Tag 1, 2.5" (both the positive and negative pieces)
Z1327 - Sparkles - blue and green assortment
Ribbon - Heavenly blue (retired)

Monday, December 5, 2011

Day 6 ... Christmas Treats

"Back in the day" I used to start December 1st and make a batch of Christmas cookies every night until Christmas.  Now I make only 2 different kinds of cookies!  I bet you are asking yourself- WHY???

Well..... #1 - My husband and I have 'issues' with fats AND sugars in our diet - Bah, Humbug!...#2 - We both need to watch our weight- Bah, Humbug!  and #3  I do not have any grandchildren (yet) to eat up all of the goodies!!

My gifts of food have changed since the 1970's!  Here is a gift that I share with family and friends.  It is a very quick and easy recipe to prepare AND decorate with the Cricut Art Philosophy cartridge.  Don't forget you can purchase the Cricut cartridge at www.ctmh.com/SweetAline

Cranberry Chutney

1 cup golden raisins
1 8 oz.pkg. of chopped dates
1 16 oz. pkg. cranberries
1 cup sugar ( I used 1/2 cup baking Splenda)
1/2 tsp. salt
1/2 tsp. cinnamon
1/2 tsp. ground ginger
1/4 tsp. allspice
1/8 tsp. ground cloves
3/4 cup cider vinegar
1/4 cup orange juice
1 T. lemon rind
1 1/4 C. water

Combine all ingredients in a large saucepan over medium heat.  Cover and cook for 15 minutes.  Fill sterilized canning jars with 1 cup of chutney each.  Chutney must be refrigerated.  Yields: 4 cups


Day 5 12 days of Cricut Christmas

Ho, Ho, Ho!  Santas are everywhere!  The sounds of Christmas music and people shopping today really put me into the Christmas spirit...  It is finally time to start wrapping the Christmas gifts!  So here is the first tag that I made for my gift giving....
With a little help from my friends... the Cricut and Cuttlebug, I was able to create this "oh so cute" Santa tag.  The first step today was to create the tag using the Cricut Craft Room - have you joined yet???? WHY NOT?  It is FREE and it makes it so easy to design and create projects.


Here is Layer #1 - notice I changed the RGB colors to create the CTMH cranberry color for the tag and Santa hat.
Here I cut out the pieces of the cardstock to coordinate with the colors on the mat.
 I cut out the separate pieces of the tag....and then embossed them with my Cuttlebug folders and added some bling to create the Santa gift tag and used a black marker to add the eyes and mouth. 

I hope I have inspired you to create your own tag using the Cricut Craft Room.  All of the shapes can be found on the Cricut Art Philosophy cartridge from Close to My Heart here.

Saturday, December 3, 2011

Day 4 - 12 days of Cricut Christmas

In this busy holiday season,  it is nice to give as well as receive- don't you think??  I like to send individualized Christmas cards so I make a variety of each plus I do not get bored when making them. (my attention span is the same as a 2 year-old!)

This is a card I made for a Christmas swap and and it was quick and easy to make with the Believe paper pack since it is 2 sided.  I also made the little gift bag from a tutorial that was posted here.

 Notice from the  above image that all I did for the card embellishment was use the cut-out from the card.  I created my own zip strip with a 1/2"strip of white paper and the words from the stamp set of the G1030 Believe Workshop to Go.  You can purchase this on my web site -www.ctmh.com/SweetAline

Supplies:
G1030 Believe Workshop to Go
Pair-A- Phrase stamp set (gift bag)
Silver Gel pen
Misc. ribbon

DON'T FORGET TO LEAVE A COMMENT!  Harley is picking a winner on Monday for a surprise Close to My Heart gift!!!!

Enjoy!


Day 3.... 12 days of Cricut Christmas

Dear Santa,

When I was a little girl I had a dream ( but I really thought it was real!) that Santa was placing my gifts under our tree! ( did I tell you I had a vivid imagination as a child???)  So I  really believed that Santa does exist - maybe in a different form than when I was a child but 'he' is there for everyone...
So today's post is one of my firsts "Dear Santa posts!
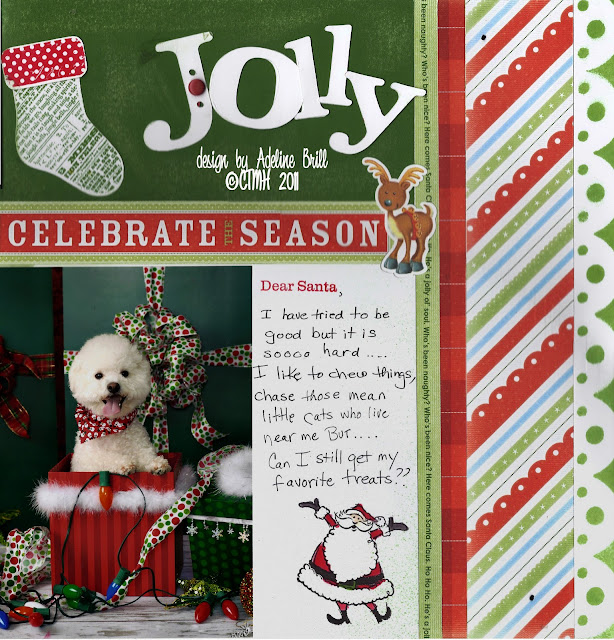
I do not have any grandchildren :( - just a D-O-G!  but his name is Harley and he is the love (at the moment) of our lives....!  So last month we took him to have his picture taken... AND here is the layout....
This layout is from the Reflections Scrapbook layouts book by Jeanette Lynton  pg 43. called Sidebars- layers...

Supplies:
X7145 Believe paper pack
X7145 Believe My Stickease
AP - 'Jolly" letters
S1110 - Holiday Magic  SOTM  for October
AP - pg 45  Font strip and Spray pen with Topiary re-inkers
AP - pg 47 Stocking cut apart and then stamped...
G1030 - Workshop To Go - Believe  stamp set - Santa
Cranberry brad  and ink -  blending pen - see pg 51 0f the Autumn 2011 Idea Book

Enjoy!

Friday, December 2, 2011

Day 2 Let It Snow, Again!

Brrrrr............ it was 45 degrees here in Tampa this morning and to all of us ( even this former Buffalo, NY gal), it was COLD!  But trust me I was not complaining....  It does inspire me though to create  a cold and sorta snowy project.


My gift for today is a decorated glass block.  It was very quick and easy, especially the vinyl lettering.  BUT it is important to follow the few tips that I share with you!

Step #1 - Design the lettering for your block.  I find it easier to apply a welded phrase to the block so I do not have so many 'sticky' parts!  I found a great set of tutorials from Joy on Obsessed with Scrapbooking here. 

My previous post gives you the link for the Cricut Craft Room  here - it is a very useful tool for creating your own designs!

Step #2 - Cut out the vinyl following these few hints.

Settings for your Cricut....
Speed - 3 or medium
Pressure - 3 or medium
Blade Depth- 4-5 .... the blade should NOT cut through to the bottom layer of paper backing - only the vinyl layer.

Here is the vinyl I used for the block.  I purchase it on Amazon.com here and it is sticker than wall vinyl ( the type Cricut sells...).  I used the silver vinyl hoping for a glitzy look... and the pic tool to remove the small pieces after I CAREFULLY removed the outside layer.

Step #3 - Carefully remove the lettering using transfer tape.. (I only had Frogger tape from my recent house painting project...)

DO NOT be in a hurry or your letters will end up in a messy ball of vinyl (ask me how I know this! :) )

Step #4 - Adhere your lettering to your clean and smooth surface....
Unfortunately the white snowflake did not show up in my photo but I did cut it out after the silver lettering....
I added the bow, tinsel and twinkling lights - it looks very festive in my foyer....

Don't forget to leave a comment or two... you may be a winner of my random 'gifts'....enjoy!

Thursday, December 1, 2011

Welcome to the 12 Days of Cricut Christmas blog party!

In the spirit of gift giving, I would like to share with everyone some creative ways to use the Close to My Heart Art Philosophy cartridge.  I am absolutely addicted to Pinterest and it has inspired me to tackle many items that have been hanging around on my "To Do" list! (some of us call it our "Bucket List"!)
 

One of the items on my list was to learn how to do some basic wood working.  When I was teaching in NYS, we had wood shop and I never had the time to learn how to use all of those noisy tools!  So here are a few pics of me operating the circular saw ( I was really nervous...)

Step #1 - Cutting the wood......


But I felt a real sense of accomplishment in cutting these blocks from an old 2 x 4"!

Step #2 - Sanding and filling in the holes....
Step #3 - Painting the blocks 
Step #4 Decorating the blocks


Supplies:
X7146 Wonderland paper pack - cut paper  3" x 3.5", 3" x 5" and 3 x 6.5" (2x)
Z1468 Topcoats Icing Overlays
AP cartridge - ... all 1 3/4" 
CTMH Glitterstack - retired ( I finally opened it and used it!)
M.S. Glittering Glue
Plastic snowflake buttons
Vinyl Lettering - check back tomorrow for a 'how-to' cut vinyl with the Cricut
Here is the Cricut Craft Room file- you can download the free site here.


Don't forget you can always shop with me at http://ctmh.com/SweetAline   Purchase the Z1686 Cricut Cartridge for $99.00 and receive the  December SOTM - S1112"Mad About You" for only $5.00 - you can see the LOVE blocks here.

Enjoy!!


Wednesday, November 30, 2011

CTMH December SOTM Blog Hop

Amazing!  December 1st already!  If you have been following our monthly blog hop, then you have arrived from Kathleen's blog.  I am having a hard time thinking of Valentine's Day but I was inspired by a set of blocks on the consultant's bulletin board.   So I created a set for myself.  The entire time I was working on these a few Beatles songs came to mind.... "All You Need is Love" (started singing it yet??)
Mad About You Stamp set


I am not a big fan of the Roxy paper pack, so I dug into my retired papers and found this pack from last year.

Supplies:
S1112 Mad About You stamp set
Sweetheart paper pack (retired)
Cardstock and inks...Cotton Candy, Tulip, White Daisy and Black
CTMH Art Philosophy cartridge - hearts cut at 1". 1 1/4", 2" and 2 1/4"
LOVE - vinyl and the Cricuit Craft Room


Now it is time to move onto the next blog and you will not want to miss what Brae has to offer on her blog here.

AND DON'T FORGET!  Starting December 1st is My "12 Days of Cricut Christmas" blog event.... (hint) - you will find out how to make these blocks tomorrow!


Tuesday, November 29, 2011

12 days of Cricut Christmas starting soon...


 This year I have been truly blessed with so many wonderful friends- far and wide. How do you decide how to include all of them on your Christmas list?? Well, I decided to create 'gifts' for everyone through my blog using my god-given gift of creativity and my Close to My Heart  Art Philosophy Cricut cartridge.
You will find in each of the 12 days... gifts of paper, fabric, wood, vinyl and food. Gifts for all of you in all shapes and forms.  Plus surprise gifts for randomly chosen 'friends' who comment on the various presents I have sent to you.


I must admit these ideas are not unique to me but 'gifts' from others in the world-wide internet.  Please accept my apologies if I do not give you proper credit but realize that you are a part of my world whenever you live!


Happy Holidays!
Adeline B

Monday, November 14, 2011

CTMH Blog Hop

OK - did you EVER get so frustrated you wanted to scream???? WELL.....that is me right now... The Circuit Craft Room is running soooo slow that I am having a super difficult time trying to load my really cool embossing idea and so I am going to wait until the morning, So if you have been hopping along with us right now, then you should have come from Haley's Blog where you will always see an inspiring design!

So I hope you will hang in there with me because you will be excited to see how I used the Circuit Art Philosophy cartridge and the Circuit Craft Room to make an embossed design. But until then you will have to hop onto Tamytha's blog where I am absolutely positive you will find an awe-inspiring piece of artwork to jumpstart your creativity!!

Wednesday, November 9, 2011

Sharing from the Heart Blog Hop

Oh my... my day started out crazy - including missing this blog post. But if you have been hopping along then you have just arrived from Wendy's blog where you have enjoyed her creative artwork. So now onto mine... Do you scrapbook and wish you could finish a page before the holiday is over?!! Well you can!! - How you ask? - well Studio J is one way to add the pictures before the Thanksgiving dishes are washed ( check out my pages under LABELS on the left)... or create this quick and E-A-S-Y layout from the Magic book this week and then just print off your photos next week....


Pin It


I am all set to capture the event and place the layouts in my album before the dishes are dried! PLUS this way I can be sure to take ONE vertical and TWO horizontal photos - crazy, I know!

Supplies:
9034 - Magic pg.62
X7142B - Dreamin' Level 2 paper pack
X7142C - Dreamin' My Stickease
Z1387 - Wooden Buttons
Z1450 - Color Ready Cork Alphabet


Now it is off to Lela's blog where I am sure you will find a super creative design!

Tuesday, November 1, 2011

November Special - Holiday Wishes stamp set

NEW Holiday Wishes Stamp set


Stamps coordinate with the NEW Cricut Art Philosophy cartridge

Stamps with the red outline around them coordinate with the cuts on the cartridge. The tree is cut at 4", the ornament and stocking are 2.5" and the star is cut at 2".


You will receive this stamp set for only $5 when you place a minimum order of $25 in My Acrylix® stamp sets* between November 1–30th. That’s a significant savings off the full retail value of $17.95 US / $19.95 CAN. You may buy one Holiday Wishes stamp set for every $25 in qualifying stamp sets you purchase.

Be sure to shop with me at www.ctmh.com/SweetAline
If you have any questions call me ot email me.

Monday, October 31, 2011

CTMH SOTM Blog Hop

Happy November! If you have arrived from Judy's blog......then you are on the right track! Here little box using the Art Philosophy cartridge is a perfect match-up with my weekend stay in the mountains of North Georgia and North Carolina. It was wonderful but exhausting! So I am a little late with my post but I do hope you enjoy it!

My daughter-in-law to be (DIL2B) birthday is on Sunday. So I decided to make her a "telescoping card". I found the directions on Splitcoast Stampers here and cut out the shapes with my Cricut Art Philosophy cartridge ( I love that cartridge!) If you still haven't purchased it, you need to add it to your Christmas Wish List!
You can purchase it here on my website www.ctmh.com/SweetAline

I used the Level 2 Sonoma paper pack (X7143B) and the My Stickease (X7143C) along with the November Stamp of the Month S1111 Cherish the Day. You can purchase all three of these items on my website as well.


Here are the cutting directions.... The hardest part is done for you! .... deciding on the sizes of all of the shapes! ("we don't need no stinkin' Spellbinder dies....")


Here is the closed card...


Pin It


Here is the opened card....

All ready for her gift card......

Now it is time to hop off to Amy's blog where you will find some more "Fall Artwork"!


So here are Mother Nature's contributions to fall....


SO Happy Fall Ya'll!!


Pin It